Friday, January 16, 2009

Using Hibernate

Hibernate is a variation on shutting down the computer system that makes use of a PC's power saving capabilities. Invoking hibernate causes a file to be created on the hard drive that contains the contents of the system memory. In essence, it memorizes applications, documents, and operating system files that are currently in use. Unlike standby, using hibernation requires that you have an amount of free space on the hard drive equal to the amount of installed system RAM.

Because all of this information is memorized and saved to a file on the hard drive the system can then go ahead and shut down entirely. There is no need to have any electricity available to the machine once shutdown is complete. When the machine is powered on again, minutes or even weeks later, rather than go through a normal start up procedure the system uses the special hibernation file to reload the state it was in when you hibernated the system.
.
There really isn't a lot of danger in using hibernate. Since open programs and documents being worked on, along with the system settings, are stored in the hiberfil.sys file that is created when hibernation is invoked, if the power does go off nothing is lost. The only thing you have to beware of is rebooting the system into a different operating system while hibernation is invoked. Doing so will almost assuredly cause data loss in the files that were active when hibernation was invoked. Why would you want to use hibernate rather than a full shutdown?
  1. It's fairly quick. Although not as fast as standby, hibernate is quicker than a full shutdown or a restart. A downside is that over time the system does tend to slow down because a full XP housekeeping regimen is missed when using hibernate rather than shutdown.
  2. The system can be set to go into hibernation automatically after a certain period of system inactivity. Very handy if you walk away from your desk and leave documents and programs open.
  3. It's especially useful on a laptop where battery power is always an issue. Setting hibernation to a fairly quick invoke rate can save a lot of juice that laptop batteries don't have to spare.

Invoking Hibernate

Hibernate can be invoked manually from the Turn off computer' dialog box. When the 'Turn Off Computer' dialog box appears the Hibernate option will not be shown. Press and hold the Shift key and the Standby icon will change to Hibernate as shown in the two screen captures below. If you forget what key to press just hover the mouse pointer over the standby icon and the balloon will remind you how to access hibernate.


It can be configured to kick in automatically via the Power Options Properties screen. In the screen capture below I've selected the Portable/Laptop power scheme that includes a setting to put the system into hibernation mode after 3 hours of system inactivity.


Thursday, January 8, 2009

Delete Temporary Files

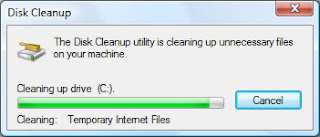
Windows Vista includes a very useful "Disk Cleanup Tool" which does exactly as the name suggests, and allows you to remove a wide variety of temporary and cached files that you no longer need. Most applications will automatically remove the temporary files once you have closed the software down, but in some cases (such as crashes or bad programming), trails can be left behind. Removing these files will create extra diskspace and keep your system in good condition.

To begin, load the Run box by pressing WINDOWS KEY + R, then type "cleanmgr" and click OK:


Now, select the drive you wish to clean up. Normally the "C:" is your primary drive where temporary files will be located. Click OK once you have done this:


It may take a few moments while the cleanup software scans your drive for files that are safe to remove:


You can then select all of the temporary file types you wish to remove. It is not normally worth removing Image Thumbnail files as these will just be recreated next time you view a photo directory. Once you have selected the file types you want to remove, click OK:


You will be prompted to confirm you are sure about the deletion. If you are sure, click Delete Files:


The Disk Cleanup Tool will then remove the selected files and close, successfully reclaiming some diskspace:


Good Luck and Enjoy our Tips

Thursday, January 1, 2009

Hide Hard Drive

It is possible to hide a hard drive letter using Windows Vista, preventing it from showing up in applications and Windows Explorer. However, this will not prevent you from access files from it manually (by browsing directly to it by typing "D:" for example). This can be useful to hide files quickly and easily.

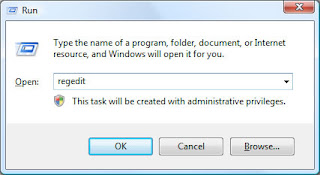
To being, load the Registry Editor from the run box (Press WINDOWS KEY + R to access this) by typing "regedit" and clicking OK:


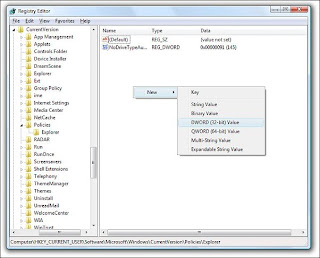
Once this loads, browse to the following registry key on the left hand side:

HKEY_CURRENT_USER\Software\Microsoft\Windows\Curre ntVersion\Policies\Explorer

Then, right click on the white space in the right hand side and select New > DWORD (32-bit) Value, and call it "NoDrives":


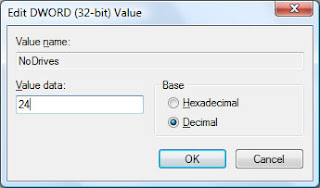
Double click on "NoDrives" to enter a Decimal value. This value depends on the drives you wish to hide, and is created by adding the numbers for each drive you wish to hide from the list below. Click OK once you have entered this number.

For example, to hide drive D you would enter a decimal value of 8. To hide both drives D and E, you would enter a decimal value of 24 (8+16):


Quote:

A = 1
B = 2
C = 4
D = 8
E = 16
F = 32
G = 64
H = 128
I = 256
J = 512
K = 1024
L = 2048
M = 4096
N = 8192
O = 16384
P = 32768
Q = 65536
R = 131072
S = 262144
T = 524288
U = 1048576
V = 2097152
W = 4194304
X = 8388608
Y =16777216
Z = 33554432
All drives = 67108863

Once you restart your computer, the selected drives should be hidden. If you wish to remove the hidden drives, browse to the NoDrives registry value and delete it.

As with all registry modifications, care should be taken to ensure that these steps are followed exactly. You should make a backup of your system before any major changes should things go wrong.

Good Luck and Enjoy our Tips
Template Rounders modificado por ::Blog à La Carte::
| 2008 |